Manual lead management is dead. Here’s how to build an inbound lead workflow in Close that runs circles around your old-school process.
When leads pour into your CRM, you have two choices:
- Scramble through them one by one, letting opportunities slip through the cracks.
- Let Close Workflows automate the grunt work, so your team can focus on what matters.
Workflows handle the heavy lifting: native, reliable automations that power multi-step outreach, auto-assign leads, and follow up at lightning speed.
This article is part 1 of a Workflow series that’ll help you set up killer workflows to crush your inbound lead game. Let’s do this.
Why Create a Workflow for Inbound Leads?
Automation enables small businesses to compete with larger competition. What you lack in people power and time, workflows can pick up the slack—and then some.
G2 reviewer Alessio Chianetta says:
“Close’s intuitive interface and robust automation features have saved us countless hours on repetitive tasks. The automation workflows have boosted our efficiency and productivity.”
Creating a workflow for inbound leads:
- Streamlines lead management. New leads enter the system, trigger the drip outreach, and are automatically assigned to a sales rep.
- Guarantees consistent, timely follow-ups. Speed counts, and automated messages keep warm leads engaged and your product top-of-mind.
- Improves sales team productivity. Workflows tackle the admin, from lead assignment to progress tracking, so your team can focus on manual tasks and closing deals.
- Scales with your business. Automation tracks your growth and high-volume sales without demanding extra human support (or extra $$$).
- Supplies key insights and reporting measures. Goals (in workflows) tell you what you need to know about lead progress (and how well the workflow performs).
Workflows create more meetings, deals, and revenue with less effort and admin from your team. They are responsive to customer behavior, and your best formulas will drive leads to engage with your sales team repeatedly.
Because workflows run natively inside Close, they’re more reliable and easier to manage than external automation tools.
Let’s get that workflow set up. 👇
Step 1: Decide Where These New Leads Are Coming From
The lead’s source will ultimately determine the content of your messages because that source reveals the lead intent. Lead intent is what you need to connect to in your outreach.
What action did the lead take to enter your funnel? Think about your:
- Free trials
- eBooks
- Contact forms
- Blog-Beiträge
- Online (or in-person) events
- Verweise
Now consider what the lead source reveals about the lead. Where are they in your sales funnel? And how should you communicate according to that information?
An example: Leads that signed up for your free trial are pretty invested, right? Workflow messaging for trial users will drive their education about how to get the most out of your solution. You might invite them to discuss pain points or concerns.
Lead source can also indicate an ICP or industry for that lead. That ideal customer profile, or ideal client profile (if you’re a coach), should always guide outreach.
An example: If they downloaded your resource guide on “the best CRMs for coaching businesses,” you know they 1) are in the coaching business and 2) are shopping for a CRM, but aren’t sold on which CRM. Now you can connect in a way that’s relevant.
Each workflow for new inbound leads should be specific to that lead source. This means you will need multiple workflows to target each lead source and associated intent.
Step 2: Set Your Workflow Triggers
Now that you have lead context, you can set the triggers to start the workflow. The filter criteria in Close are based on 1) Lead Status and 2) unique Custom Fields.
Filter for qualifiers like:
- Certain business sizes (if you sell B2B)
- and/or certain lead statuses (like current trials)
- and/or certain lead assignment statuses (like not currently assigned)
- and/or certain ICPs (like personal coaches)
These criteria tell the system exactly what qualifies a lead to be enrolled in each specific workflow—and then triggers the outreach.
Our sales team at Close has a workflow we call New Coaching Trials. Its triggers filter for:
- Leads that are currently on a trial
- AND don’t currently have a lead assignment
- AND are in our coaching ICP
- AND have been marked as an ideal customer
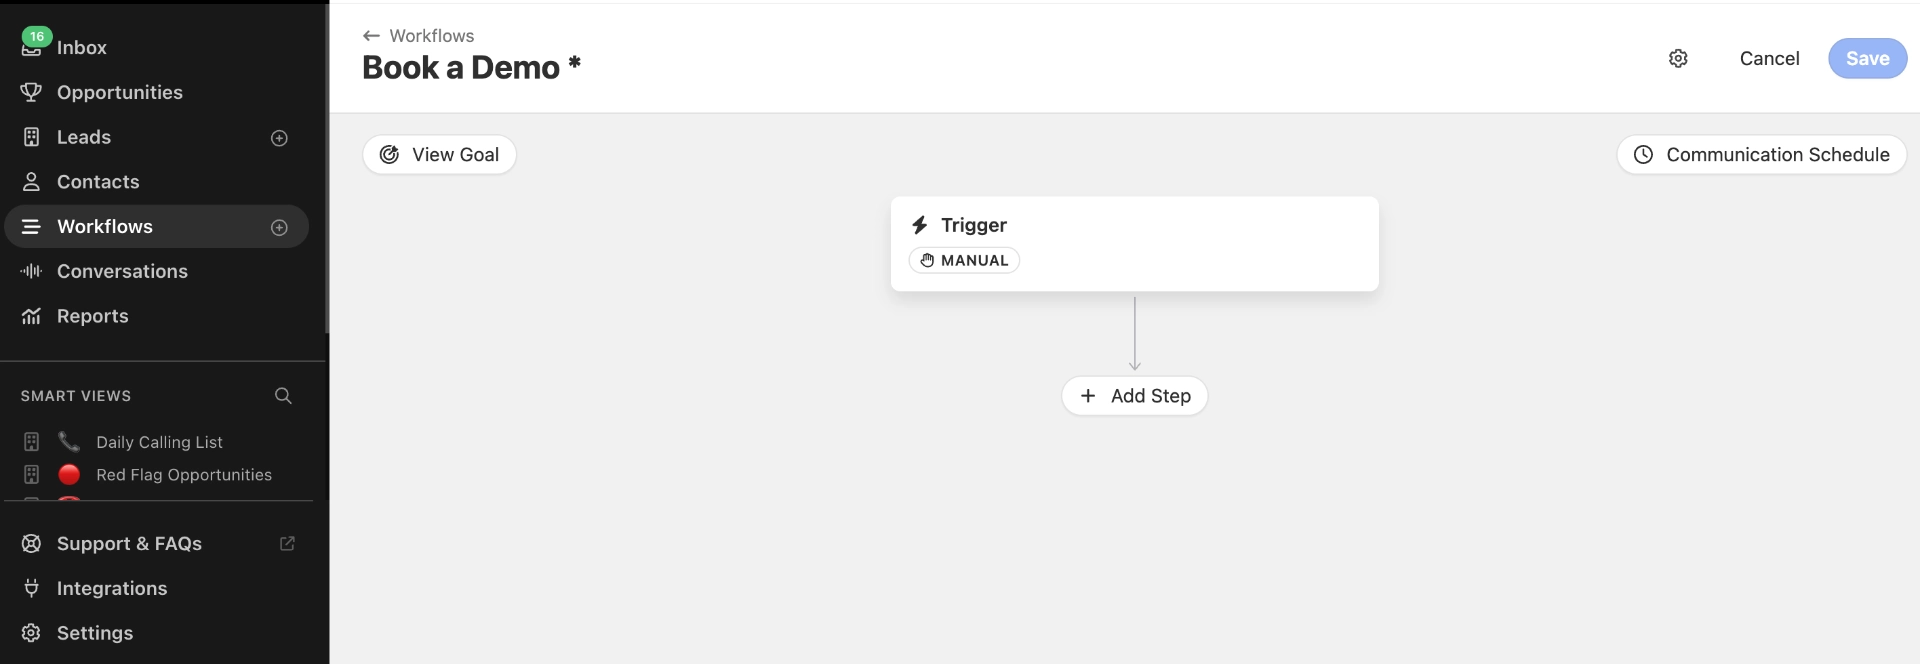
When new leads enter the funnel that meet those conditions, the rest of the workflow is triggered, starting with the lead assignment (next step).
Step 3: Set Up Lead Assignment
New leads will need new lead assignments. So? When the workflow triggers, your first automated step should direct that lead assignment.
There are three ways leads can be assigned in workflows. Consider the circumstances:
- Leads can be assigned to an individual person. This makes sense if you have a one-person sales team. (Or if you have specialized lead sources for specialized sales reps.)
- Leads can be assigned round-robin when your sales team is small, and you want leads to be evenly distributed. One exception: Sometimes, the lead source itself connects to a specific rep.
For example, the lead may have booked a call with Daniel via Calendly. Calendly (linked via Zapier; we’ll talk about that later) will skip the round-robin distribution and assign the lead directly to Daniel.
- As your team grows and becomes more specialized, leads can be assigned to a group, too.
“Large teams often evolve to have different groups that handle different types of leads,” said Forrest Dwyer, Customer Success Manager at Close. “Maybe your SDRs handle leads that are warm but not booked yet, while your AEs take the high-revenue-potential leads.”
Teams with 15+ reps might also be assigned to groups based on territory. This could be an industry specialty (like B2B SaaS) or a geographic area (like the West Coast).
How to set this up in Close: Lead assignment automation is inserted into the workflow like any other step. Click + Add Step, and you’ll find Assign User, along with the Custom Fields you can use to direct the process (like geographic territory).
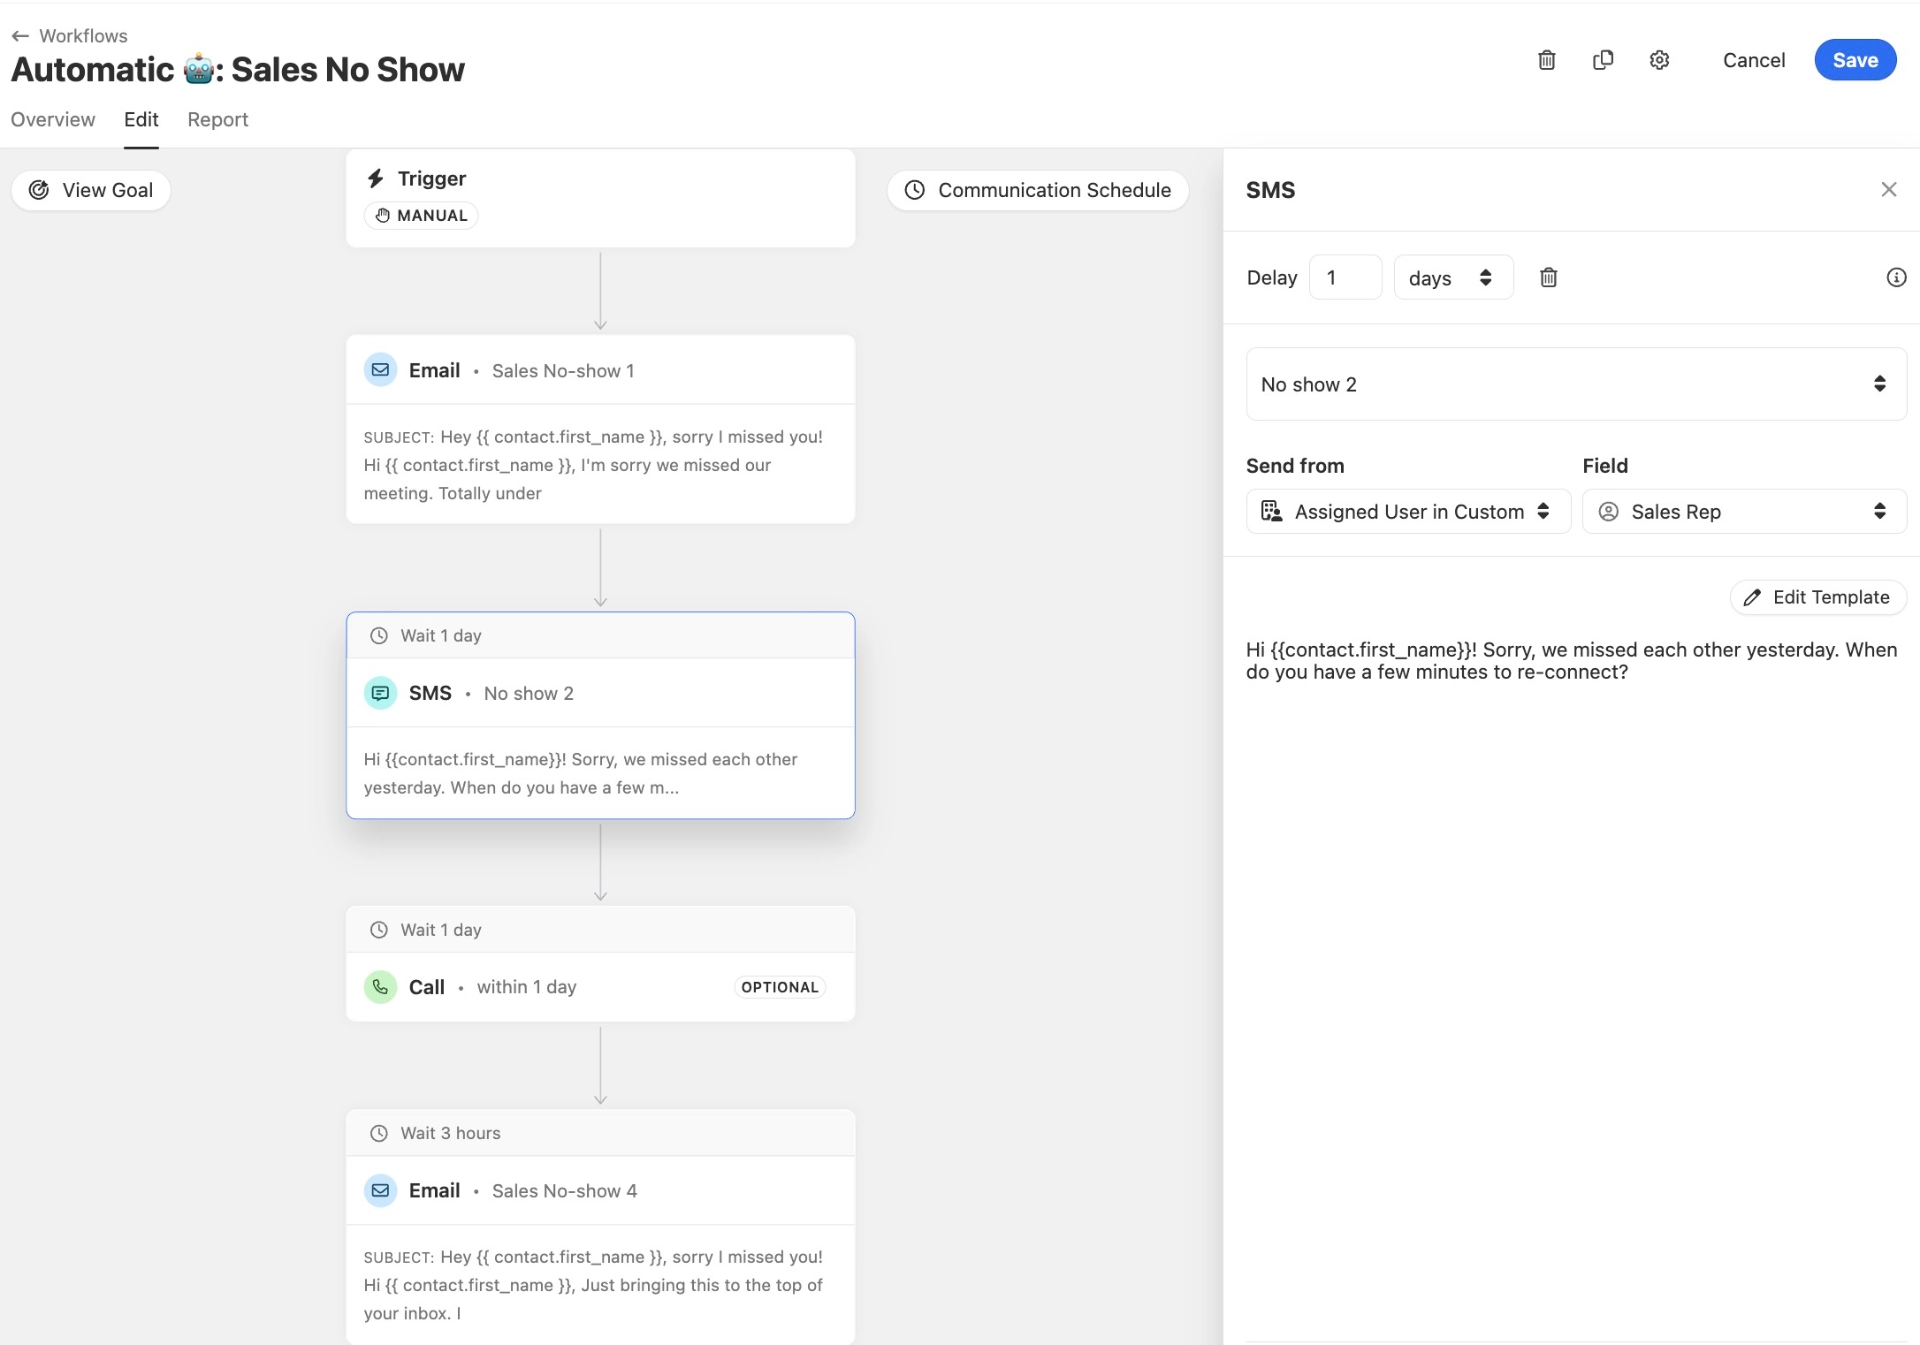
Step 4: Build Your Messaging For Different Channels
Now that you know your leads’ intent and who is managing each lead, it’s time to craft some killer email and SMS messages that resonate and drive new leads to engage with your reps.
The key here is not to communicate like an automated robot. You need to be personable and approachable. With these tips and templates, you’ll do just fine.
How to Create Messaging That Converts: Quick Tips
Leads like to reach real humans, and they’ll be more likely to respond if they believe one is sending the message.
(Edelman’s Trust Barometer shows that when leads believe they’re talking to a real human, they’re more likely to trust the information being provided, ask clarifying questions, and move forward in the funnel.)
And you are a human sending the message. Even though the send is automatic, their response (when they respond) will go to a sales rep. So make a solid, human-first impression.
Here are some quick tips for creating messages that convert:
- Use a conversational tone. Lean into your natural, casual writing voice so it reads like you are having a chat (or text convo) with a friend.
- Keep it short and simple. Don’t overwhelm your audience with long paragraphs or too much information. Pick one main point and stick to it!
- Ask questions. Human conversations are two-way, so ask questions that encourage a genuine response. For example, “What tool are you using to manage customer data?”
- Include your real name. The lead has already been assigned, so introduce yourself. Connecting human-to-human helps build the customer relationship.
- Choose a soft CTA. “Buy now!” is not the vibe. Opt for “Do you have five minutes for a quick call?” or “Can I give you some tips on how to explore your free trial?”
- Test out emojis. 🎯🚀📈. Don’t go too 🤦, but you can have a little 🥳.
Remember that these messages represent your earliest individual contact with these leads. As you open the conversation, tone, and content matter!
Steal some of our favorite message templates below.
Examples of Inbound Messaging You Can Steal
Here are three message template examples for your new lead workflow. Adjust as necessary to match your brand’s tone, audience, and product or service:
#1 Email
This can read:
#2 Email
This can read:
#3 SMS
Do you have what you need with [lead source]? Got 5 min to chat this week?
This can read:
… and on and on, it goes for as many outreach steps as you want. Remember to include calling tasks, too. We’ll talk more about that in Step 6!
Step 5: Set a Communication Schedule
Imagine you get a text that says: “Hi James! I’m Kat from FoundersFirst. I saw you downloaded our guide on how to build an all-star sales team. How do you currently approach hiring?”
… and it’s delivered at 3 a.m.
The timing implies automation. (Or a sleep-deprived salesperson who doesn’t understand work-life balance.) In any case, you probably won’t get a response.
But you have workflows! In the top right corner, you can adjust the communication schedule based on time zones and weekdays vs. weekends.
A lead’s time zone is automatically determined by their phone number’s country and area codes. And if they don’t have a phone number, you can set a fallback timezone.
Now select your ideal communication window so messages get sent at reasonable hours. What works best for your leads? General advice says that between or around 10 a.m. and 2 p.m. is optimal.
Step 6: Decide on the Frequency and Duration of Your Workflow
When you have warm leads, it makes sense to reach out frequently until you get a response. How often you reach out—and for how long—ultimately depends on your team, business, audience, and industry.
It’s typical for our coaching customers to make 20-30 calling outreach tasks before they move on from the lead. But across customer industries and companies, we often see 10-15 outreach steps over two weeks to two months.
Forrest Dwyer (one of our Customer Success Manager at Close) says:
“The further you get in the process, the more automated it makes sense to get. You don’t want to be wasting your reps’ time with people that just aren’t responsive.”
Best practice says to move your manual calling outreach early in the workflow and then let it taper into more automation. For example, if you have 30 touches over two months, push the majority of the calling tasks to the first two weeks.
Pro Tip: This is particularly helpful with new leads, so you don’t waste time on the ones who won’t bite! If the lead doesn’t convert or book a meeting, you could even flip them into a nurture workflow.
Calling steps send the notification (and time window) so that the call fits into the workflow. But these automated emails and SMS and manual calling tasks need a frequency schedule, right?
Workflow delays help you space out your outreach. You can delay by either hours or days, and it works within your set communication schedule. With the first step, you should reach out immediately once the workflow has triggered. After that? Use your judgment.
The key here is to be natural. Sending a text at 10 a.m. followed by a call at 3 p.m. feels organic.
Step 7: Set End Goals + Close Out the Workflow
Conversion goals tell you exactly how well leads responded to your outreach steps, and tell the system when to stop the workflow.
By default, when you get an incoming email, SMS, or call, the workflow is paused, and conversion is counted. You can adjust these goals to exclude any of the three channels. In the top left corner, click View Goals and make your choice.
What happens after this initial workflow? If every outreach step runs and still no response, the final step can be Update Lead Status and you can pipe them into a Smart View to follow up later (like in 30 days). Or you could update lead status to “nurture” and kick them into a nurture workflow.
Whatever you do, finish strong. Don’t waste your time on unresponsive leads. ✌️
Final Thoughts: Getting New Leads into Close + Creating powerful Automated Workflows = More Deals Closed, Faster
Your freshly minted workflow is ready to engage more new leads in more ways and close more deals. Success! But remember how we started? We talked about the lead source.
And what if your lead source is external, like Calendly or Typeform?
While many teams now rely on native Close workflows, Zapier can still be used for external tools when needed.
Ready to take automated workflows (and Close) for a spin?